Skip to content
Blurry photos ruin the quality of the picture, which needs fixation. In this regard, Photoshop plays a significant role in fixing blurry photos. It has become one of the best tools for fixing blurry images. But how to fix blurry pictures in Photoshop?
- Duplicate the image, apply Gaussian Blur to a copy, then Apply Image with Add, Scale 2, Invert, and set blend to Linear Light.
- Create multiple copies of the sharpened layer to intensify sharpness, checking each copy for the best result.
- Noise reduction alternative: after Gaussian blur use Filter > Noise > Reduce Noise, then continue with the same Apply Image and blending steps.
- Professionals recommend the Sharpen method over Noise Reduction for stronger results on most blurred images.
Open the picture in Photoshop, create a duplicate picture, apply the Gaussian feature, apply the jpeg image, make light adjustments, and create copies of sharp images. If using noise reduction, apply noise reduction after the Gaussian feature; other steps are the same.
In this article, I will give you a step-by-step guide with supported images to fix blurry photos in Photoshop. Stay tuned.
How to Fix a Blurry Picture in Photoshop – 2 Proven Methods?
Do you want to know how to fix blurry photos in Photoshop? There are many ways to fix blurry pictures in Photoshop software.
You can choose from two popular methods for fixing blurry photos, such as sharpening blurry photos or using noise reduction tools.
You will get mind-blowing results by fixing the blurry images in the Photoshop app.
Method 1 (Fixing blurry photos in Photoshop): Use the sharpening blurry photo tool
This technique blew in mind so much that I could not wait to share it with you. I am sharing an amazing technique with you where you will get awesome photos by sharpening the blurry photos.
Let’s discover and understand how this technique works.
1. Open the picture in Photoshop.
First of all, we are going to bring in the high resolution image. Go to the open file, and then from there, you go to the image where it is. Double click on the picture or drag it from files, and it will come into your Photoshop program. Select single product photos or model photos.
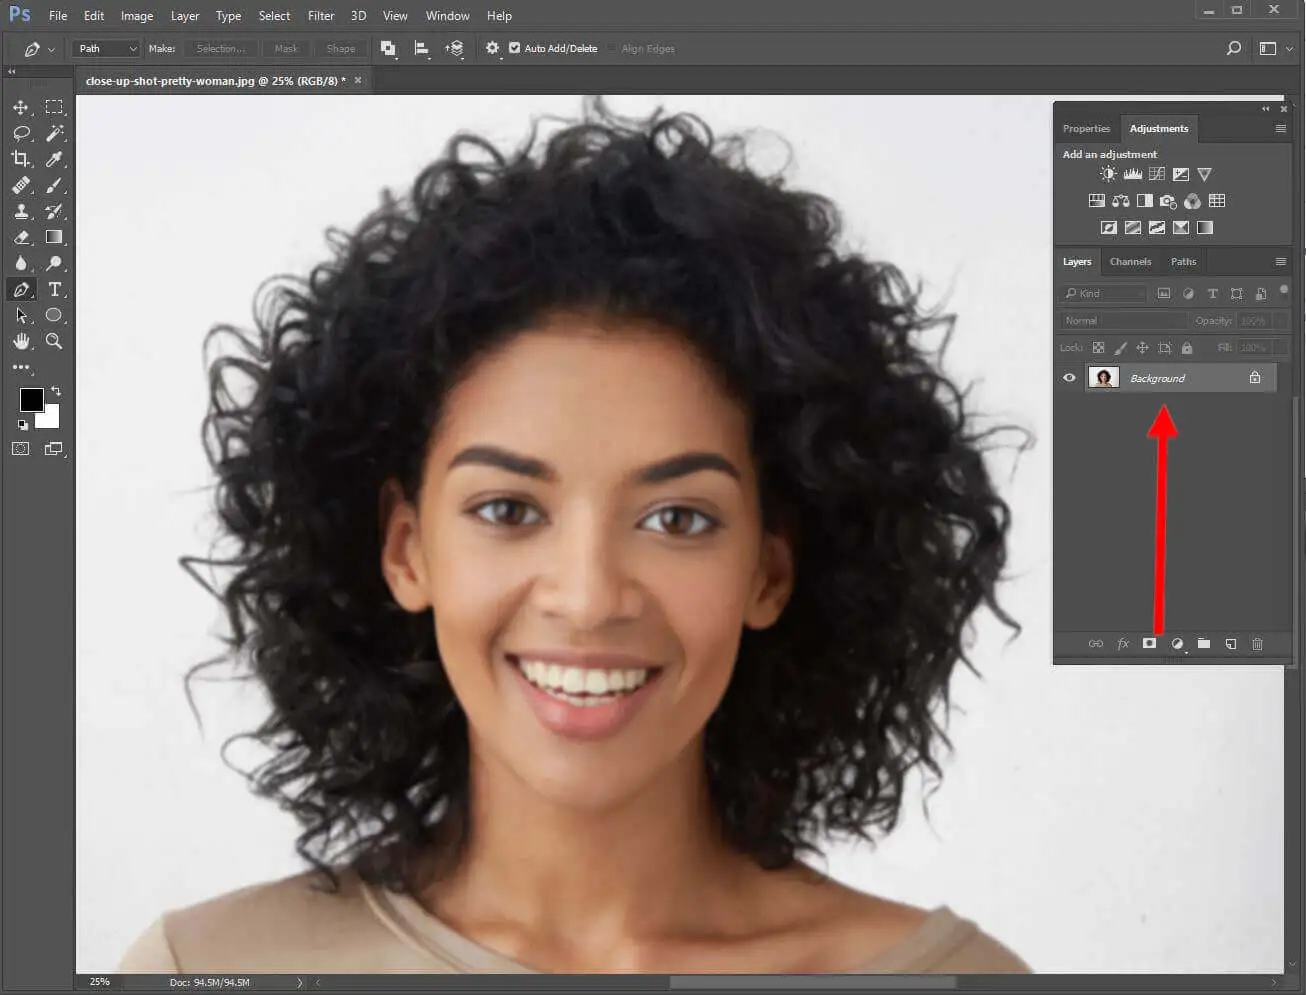
We have this selected blurry photo that we want to fix with a sharpening tool.
2. Duplicate the picture.
Then the next thing you should do when sharpening blurry photos is duplicate the picture. Make two more layers of this picture. You can do it by pressing the Ctrl+J command in the Windows system, and if you are using a Mac device, press Command+J.
Once you have done, you will see two layers of the pictures, as you can see below the image. There are two layers of the image, layer 1 and layer 2.

3. Start sharpening the image.
So from here, we are going to sharpen to fix blurry photos. You will see two-layer; put off layer 1 copy by pressing the eye sign on the top right side of layer 1 copy.

Then go to the filter and then blur to the Gaussian blur menu.

You will see the Gaussian blur Menu to set the radius. Set the radius at 6, but you can select whatever number you want. It depends on how sharp you want your picture to be.

Once you are done, press “OK.” Now go to layer 1 copy and bring that back to expose the pressing eye sign you pressed first for putting it off.
4. Apply Image.
The next step is to fix blurry photos Photoshop is to apply the image. Go to “Image” and then “Apply Image.”
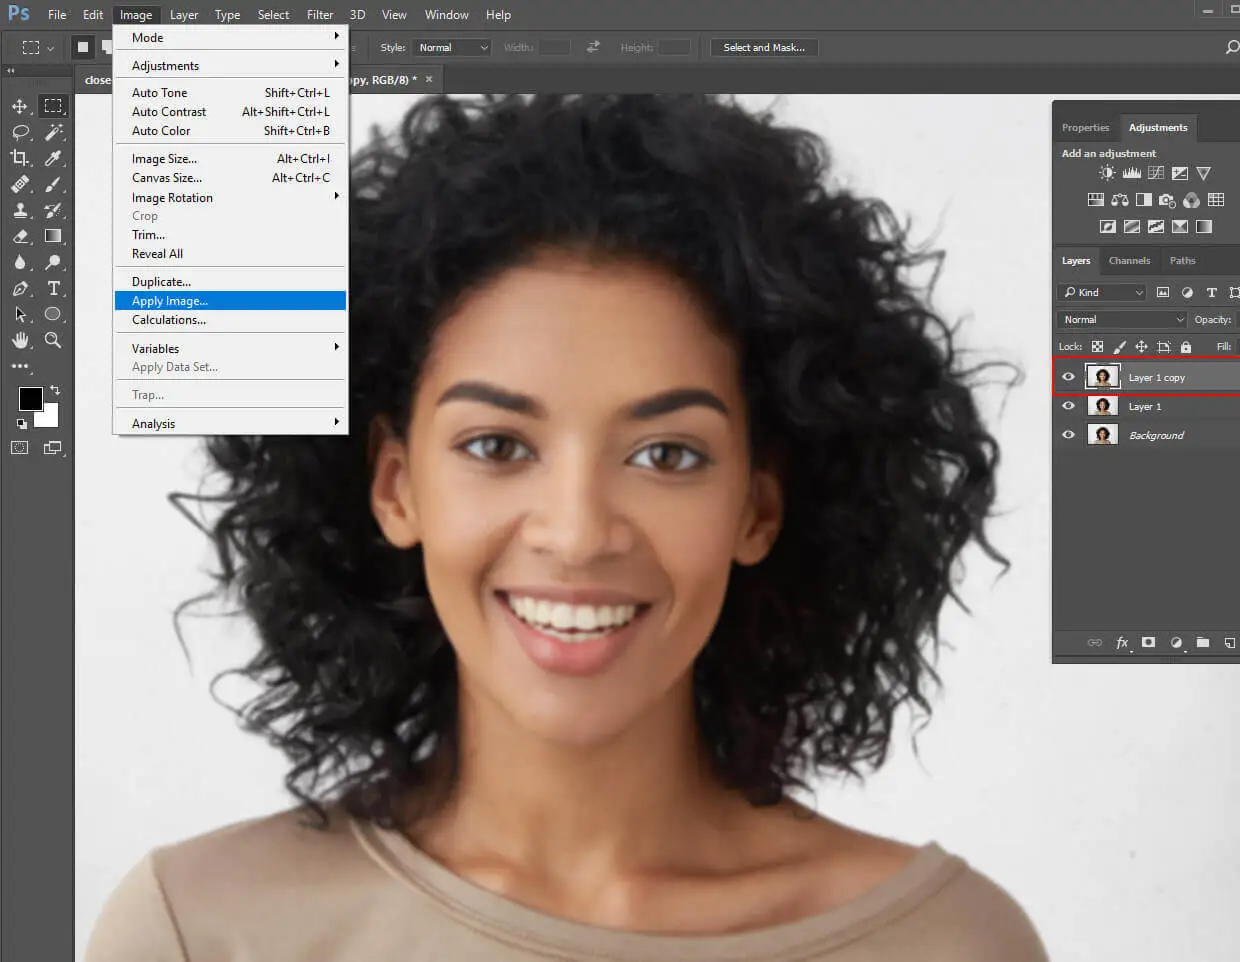
You will see the dialog below.

Go to Layer and select “Layer 1” from the drop-down list. Go to the “Blending” and select “Add” from the drop-down list.
Then change the “Scale” into 2. Check the “Capacity”; it should be 100 %. Then click on the “Invert.” You will see the dark background in place of the picture.

Once you have done the settings, press “Ok.” Image setting will apply on Layer 1 copy.
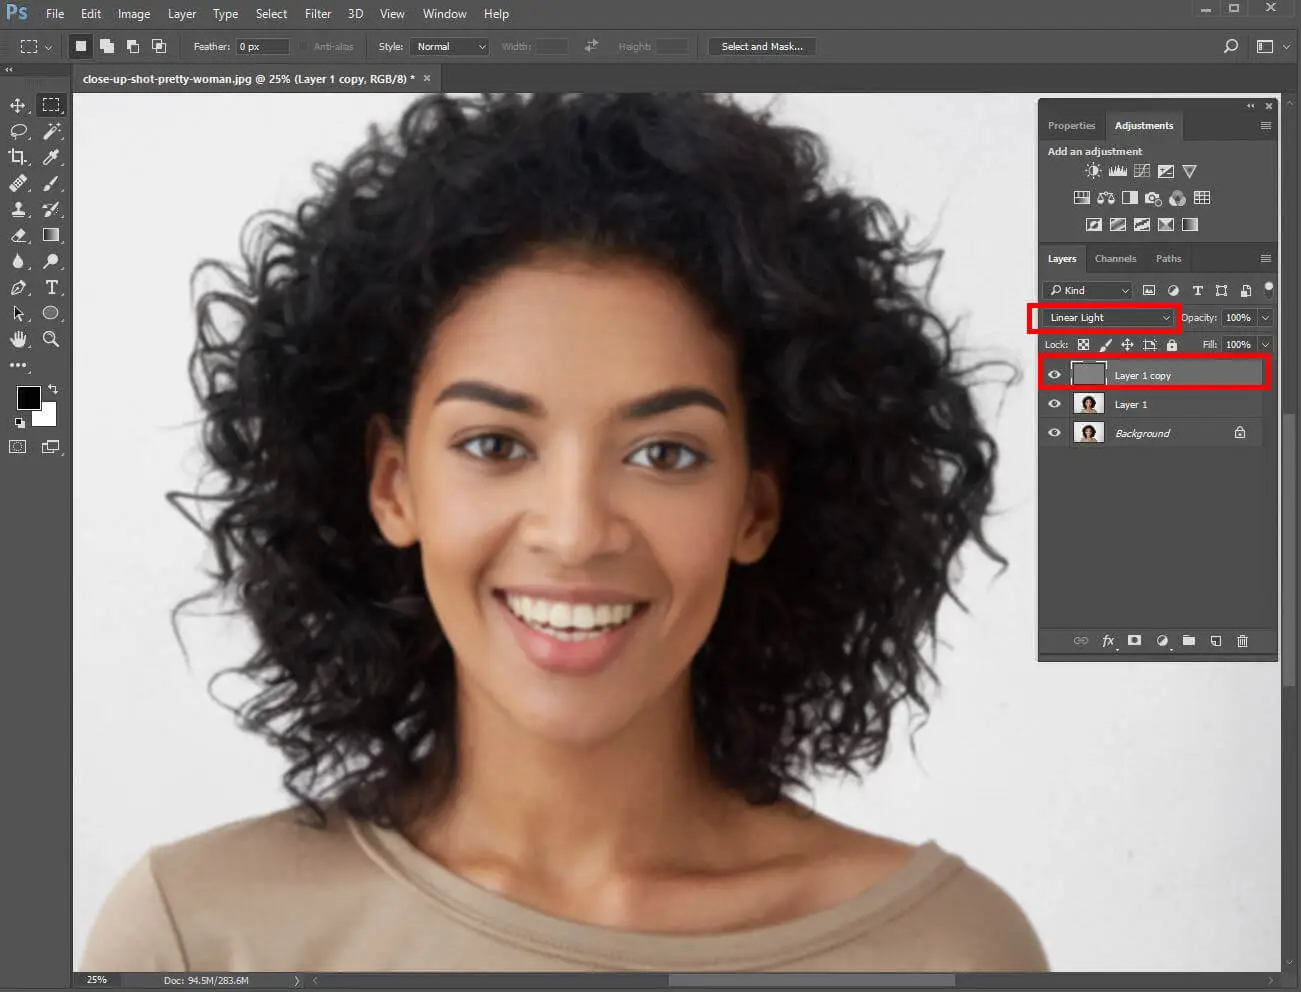
5. Set the Linear light.
So the next step is you come over to the above menu” Normal,” click on that and select the Linear light option from the drop-down list.
You will see the picture will become transparent. Come to the below layers and see layer 1 is invisible.
6. Create copies of the image.
Next, you will need to create a copy of the image; the process is the same as you did it before. For the windows system, press “Ctrl + J,” If you have a Mac device, keep holding “Command down + J,” and you will see a copy of the image.
Create six layers of Layer 1 copy. Click on Layer 1 copy and keep pressing “Ctrl +J” layers will be created. Give the same command for each copy.
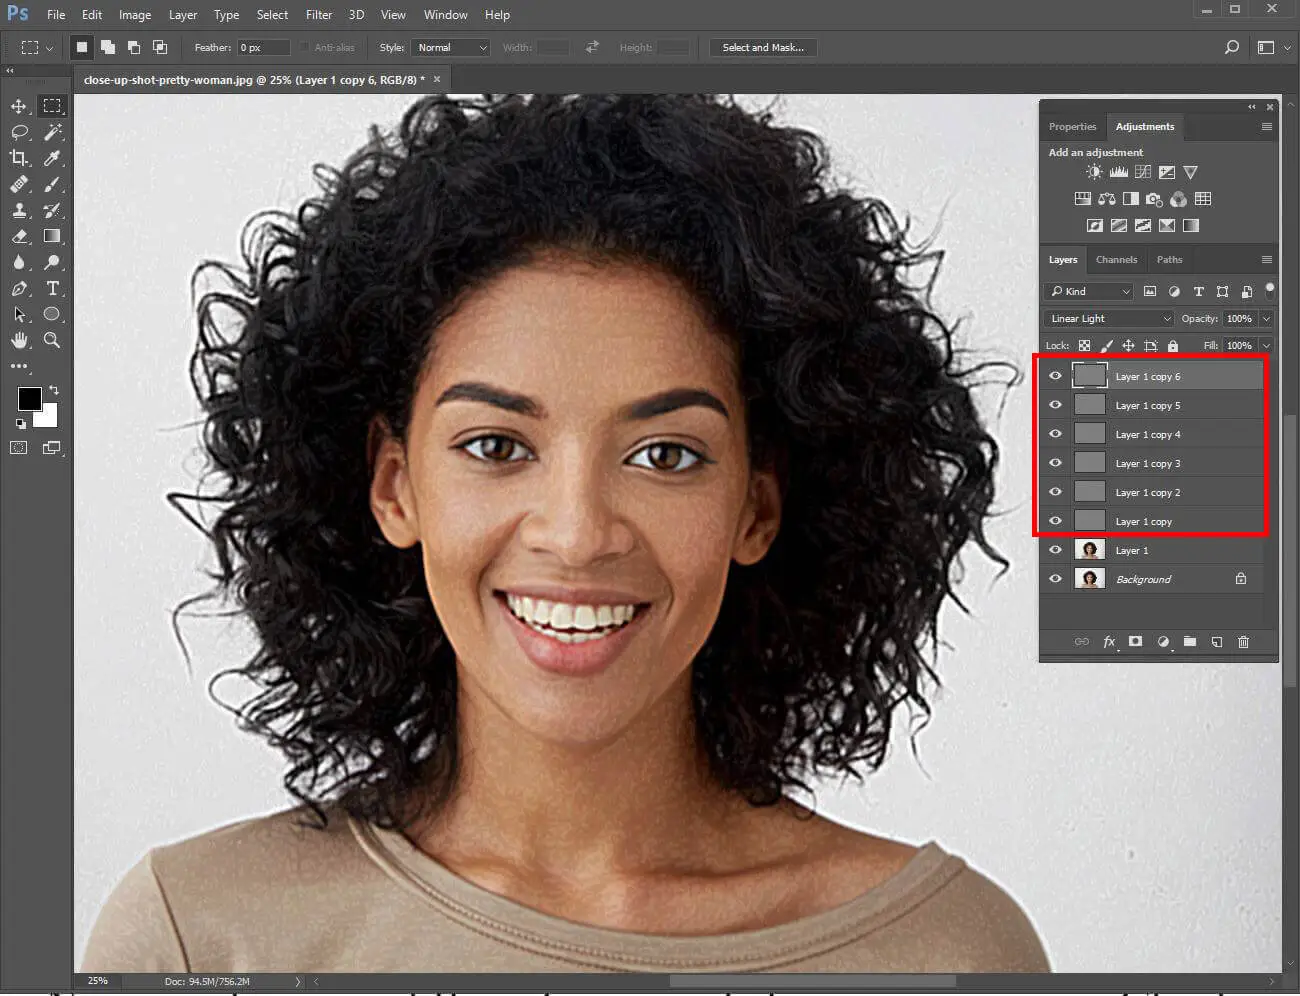
Now you have six different copies of sharpening images. Check each one by clicking on the copies. All of the copies will be sharp and clear.
I hope now you can fix blurry images through this simple process. You can practice with different blurry pictures. You can play with radius, lens, and filter to get clear and sharper images from the Photoshop tool.
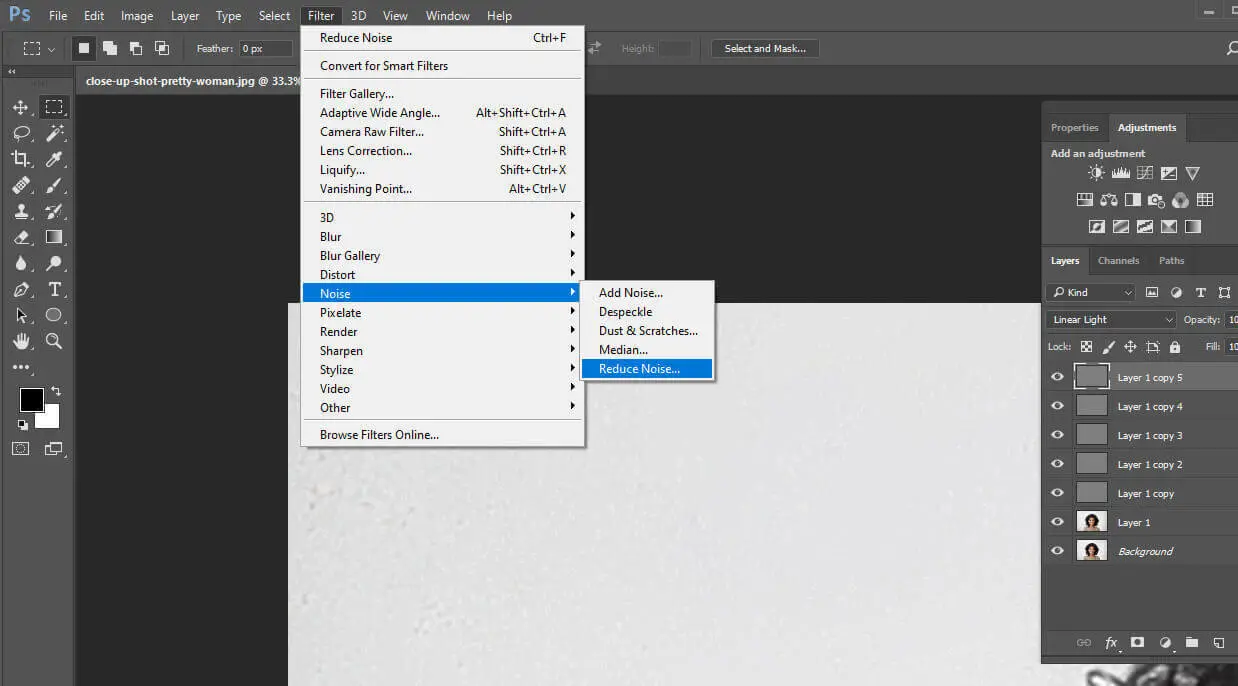
Method 2: Make a blurry picture clear in photoshop through the noise reduction tool:
There is not much difference between the sharpening and noise reduction methods when fixing blurry pictures.
The above steps are similar to step three, using the “Gaussian” feature in the “Filter” Menu.
The difference is that when you apply the Gaussian feature, you will use the “Noise” menu from the “filter” menu.
After that, all subsequent processes for adjustments of pixels and applying light, and creating copies are the same.
Using the Noise reduction tool:
Once you have applied the “Gaussian” Feature, then Go to filter, then select “Noise,” and next go to “Noise reduction.” Make some adjustments to make your blurry picture clear.
After that, further steps are similar to the sharpening tool.
Photoshop Sharpen tool VS Noise reduction which one is better?
The Sharpen tool is better than the noise reduction tool for fixing blurred photos in Photoshop. You may get the best results from the Noise reduction tool. But professional editors recommend Sharpen tool to clear the blurry images to look best.
HitPaw Photo Enhancer is a powerful tool that allows users to enhance their photos quickly and easily. It is designed with advanced algorithms that can analyze and adjust the brightness, contrast, saturation, color, and other aspects of your images to improve their overall quality. The interface is user-friendly and easy to navigate, making it accessible for both beginners and professionals alike.
Frequently Asked Questions
Yes, Photoshop does an excellent job of fixing blurry pictures. You have two easy methods to fix blurry pictures in Photoshop. The first method is through the sharpening tool, while the second one is through the noise reduction method.
Sharpening is the best tool for fixing heavily blurred images. You can try the Gaussian blur feature and then sharpen the filter. Once made, try different pixel adjustments to reduce the blurriness effects and increase the sharpness. You can easily make blurry images look good. If you want, you can now upload it to your default content or to your sites.
Fixing blurred photos in Photoshop by the noise reduction method is not much different from the sharpening tool. After applying the Gaussian blur feature, all the steps are the same except for the next force, the Gaussian blur feature. You will go to “Noise” in the similar menu “filter” and then “Deskpeckle.” The next process of editing is also similar to the sharpening method.
Photoshop is a reliable tool that never blurs images automatically. If you find some blurred images after editing in Photoshop, it means you have raster images. Raster images, when stretched in editing tools, result in pixelated pictures.
You can easily fix that edge problem in Photoshop. Make a mask first and then go to the “Properties dialog box menu.” Here you will find the slider “smooth.” You can smoothen the rough edges of the pictures through adjustments from that menu.
Conclusion
No one likes blurry images; they are dull, look tedious and ruin the attraction. You will not want to share blurry images with friends and others. It is better to draw blurry to clear pictures using photo editing tools.
You may come up with hundreds of photo editing tools and free sites. But when it comes to perfection in your tasks, there is no better tool or source to fix blurry pictures in Photoshop. You can use its sharpen tool or noise reduction tool to improve blurry image quality.
Both are simple and reliable ways to adjust or fix the images, but the sharpen tool is the most recommended tool by professionals because of its better results and values, even for raster images.